Do you struggle with constantly looking back and forth between your sheet music and your hands while playing the piano? Is sight reading a challenge for you? In this week’s tutorial, we will delve into an essential concept for piano playing: hand position.
In piano playing, we traditionally understand “hand position” as a term that involves making sure the hand is well supported with the “hand bridge.” However, in this post, I want to explore a different aspect of hand position—the positioning of your hand on the keyboard.
A “hand position” in this context is when your hand essentially remains in one place over a group of notes that you can play without moving your hand. A classic example of a hand position is the five-finger pattern, where your hand covers five notes, with each finger placed on a specific key.
Another example of a hand position is a three-note chord. In this case, your hand spans five notes, but you only play three of them, allowing you to easily reach each note without shifting your hand to a different section of the keyboard.
A hand position can extend past the boundaries of just a five finger pattern, but it is by definition, a placement of the hand that allows you to play multiple notes without moving up or down the keyboard into a new position. Moving between hand positions on the piano can be disorienting and it takes some practice.
While a hand position can extend beyond the confines of a five-finger pattern, it fundamentally represents a hand placement that enables you to play multiple notes without moving up or down the keyboard to a new position. Transitioning between hand positions on the piano can be disorienting, requiring practice to gain comfort.
If you find yourself frequently looking at your hands while reading sheet music, chances are you are searching for the next hand position. This issue with hand position explains why beginner method books often focus on developing finger independence within a single hand position before gradually introducing new positions as you gain proficiency.
This is also why pieces that require more frequent hand position changes —where you have to jump around the keyboard—are usually considered more advanced.
Because the piano has more than 10 keys, but you only have 10 fingers, you will be moving from one hand position to another as you play and move around the piano. With more than 10 keys on the piano but only 10 fingers to play them, transitioning between hand positions becomes inevitable. Understanding how the hand moves between positions on the piano will help you improve your piano skills by enabling you to recognize patterns in the music and group notes together, thinking in terms of clusters rather than individual notes. This, in turn, will improve your accuracy, and it will also help you choose fingering more easily.
In this post, I’m going to go over several important aspects of hand position and what to consider. Or, watch the video here:

Blocking triads up and down the keyboard
Many passages in piano music consist of patterns like scales and triads. This example, from Schubert’s Impromptu in A-flat, Op. 90, No. 4, features a recurring pattern of triads.
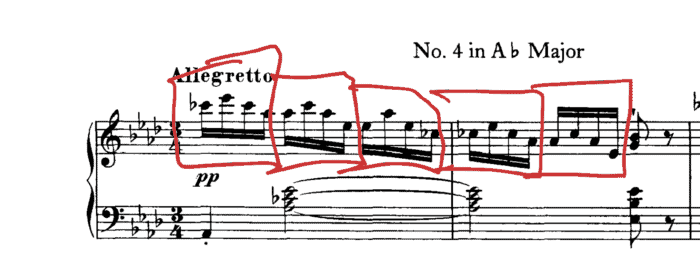
To practice this, I recommend playing each triad as a blocked chord. This approach will help you form an understanding of the hand positions required to play it.
By blocking the triads as you move down the keyboard, you can mentally and physically group the notes together. This allows you to look at groups of notes, rather than processing each individual note as you play.
Identifying hand position changes
Sometimes a piece has clear hand position changes but they are not arranged in straightforward triad or chordal patterns. In that case, look for the places where the thumb moves to a new position while the other four fingers are able to easily sit above the notes they will play.
In this example from the Paradisi Toccata, you can t use each place where the thumb moves to determine the next hand position.
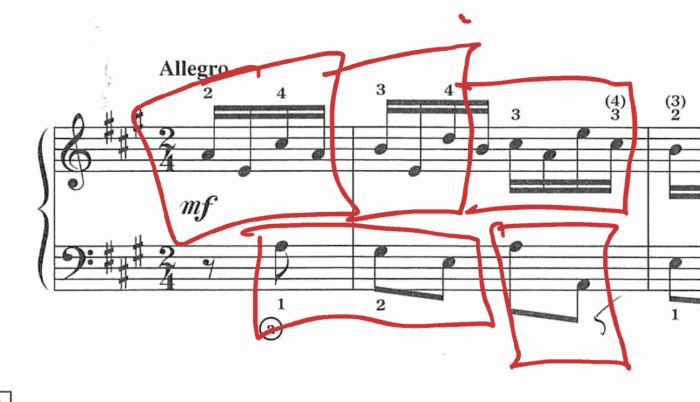
Just like in the earlier example, practicing this by blocking the hand positions will help you learn the notes more quickly.
Preparing early
When moving from one hand position to another, you will need to move very swiftly during any rests or spaces between the notes that occur.
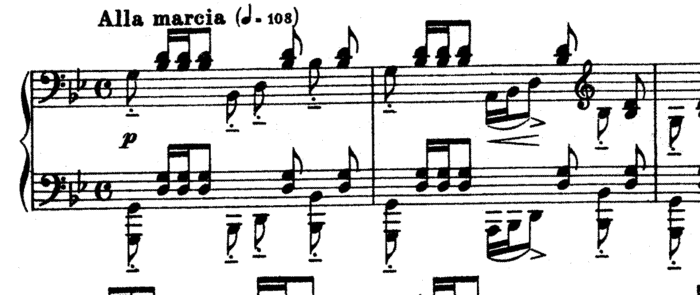
Cultivate the habit of thinking ahead so you are already anticipating the direction of your next move. In the Rachmaninoff G Minor Prelude, Op. 23, No. 5, for example, the hands move between different registers of the keyboard. Already, as you play the first note of the measure, start anticipating the need to move your hands to the right to play the three rapid chords. Therefore, you’ll release the first bass note in an elliptical direction, to the right, rather than lifting straight up and then moving over.
In conclusion
Thinking in terms of hand position and blocking chords is a crucial component of fingering. Once you can identify your hand positions, you will make more intuitive fingering decisions, ultimately enhancing your piano skills. It takes some time and practice, but embracing the concept of hand position and incorporating blocking chords into your practice will have a positive impact on your accuracy and overall performance.